[guitar tab] Negro y azul, de Los cuates de Sinaloa

Posted: sábado, 30 de marzo de 2013 by Termita in Etiquetas: , , , , ,
0


El punteo no está transcrito, pero los acordes, al parecer son estos.

RE#                                    LA#
La ciudad se llama duke,nuevo mexico el estado
                                     RE#
entre la gente mafiosa,su fama se a propagado
LA#                      RE#
causa de una nueva droga, que los gringos han creado.

Dicen que es color azul y que es pura calidad
esa droga poderosa, que circula en la ciudad
y los dueños de la plaza,no la pudieron parar.    re7

                  G#
Anda caliente el cartel,
al respeto le faltaron
A#
hablan de un tal heisenberg,
que ahora controla el mercado
nadie sabe nada de el,
                     RE#
porque nunca lo han mirado.
                  A#               RE#
el cartel es de respeto y jamás a perdonado
                  A#                 RE#
ese compa ya esta muerto,nomás no le han avisado

La fama de heisenberg ya llego hasta michoacán
desde alla quieren venir a provar ese cristal
ese material azul ya se hizo internacional.

Ahora si le quedo bien, a nuevo mexico el nombre
a mexico se parece en tanta droga que esconde
solo que hay un capo gringo,por heisenberg lo conocen.

Anda caliente el cartel,
al respeto le faltaron
hablan de un tal heisenberg,
que ahora controla el mercado
nadie sabe nada de el,
porque nunca lo han mirado.

A la furia del cartel,
nadie jamás a escapado
ese compa ya esta muerto,
nomas no le han avisado.

fuente: lacuerda.net

[guitar tab] Clavelitos

Posted: by Termita in Etiquetas: , ,
0


Moderato: 3/4

         LAm
    Mo  ci   ta,  da  me_un   cla   vel,   da me_el cla vel de
e-------------------------------------------------------------
B-------1----0----------------0-------------------------------
G-----------------2-----1------------2----------------------0-
D---2---------------------------------------2--2----2---2-----
A-------------------------------------------------------------
E-------------------------------------------------------------

    MI7
 tu bo ca, que_en e so no_hay que te ner  mu cha ver güen za ni
e--------------------------------------------------------------
B-----------------3-1--0----------1--0----0--------------------
G-----------------------------2--------------1-----------------
D-3-2--0---2-------------------------------------2---2----2--0-
A--------------------------------------------------------------
E--------------------------------------------------------------

LAm     SOL7                 DO         SOL7         DO
po ca. Yo te da ré_un cas ca bel te lo  pro me to mo ci ta,
e--------------------------------------------------------------
B---------------------3---0--------------------3--0------------
G------0--0--0--0------------0---0---0--0---0--------2--0------
D-3-2----------------------------------------------------------
A--------------------------------------------------------------
E--------------------------------------------------------------

MI7                    LAm          MI7          LAm
Pa ra que_en vi die la miel que tie nes en la bo qui ta
e--------------------------------------------------------------
B---------------0---------------1---0---3-----0----0-----------
G-------------------1-------2--------------1-----------2-------
D-2-2--2------2--------2---------------------------------------
A--------------------------------------------------------------
E--------------------------------------------------------------

        LA                                               MI7
 Cla ve li tos, cla ve li tos, cla ve li tos de mi co ra zón
e--------------------------------------------------------------
B------------------------------2---2--2---0--------------------
G-2-------------2---2---2---------------------2--1-------------
D----2--2------------------2------------------------4--2--0----
A-----------4--------------------------------------------------
E--------------------------------------------------------------

                                                          LA
 Yo te trai go cla ve li tos en cen di dos co mo_es ta pa sión
e--------------------------------------------------------------
B----------------------------0--0---0--------------------------
G--------------1---1--1----------------2---1-------------------
D-0--0--0----------------0---------------------4-----2--0------
A-----------2-----------------------------------------------4--
E--------------------------------------------------------------

                                                        RE
Si_al gun di a cla ve li tos no lo gra ra po der te tra er, no
e--------------------------------------------------------------
B----------------------------2---2--2--0---------0--2---3---3--
G-2---2---2----2---2---2------------------2---2----------------
D------------4------------2------------------------------------
A--------------------------------------------------------------

                        LA              MI7                   LA
 te cre as que ya no te quie ro, ni que fue ron pa ra_o tra mu jer
e-----------------------------------------------------------------
B-3-3-------------2--2---2-------0---0---0------------------------
G-------------------------------------------2---1---1-------1--2--
D-------4--4---4-------------2---------------------------4--------
A-----------------------------------------------------------------
E-----------------------------------------------------------------

Impermeabilización de una réplica

Posted: by Termita in Etiquetas: , , ,
0

Estos lo han hecho.


Por airsoftbarcelona (vandalos) había una persona que impermeabilizó su réplica.
HowTo inminente @@@@@@@@@@@@@@@@

[HowTo] Eliminación del óxido

Posted: by Termita in Etiquetas: , , , ,
0

El método casero, y por tanto más accesible, es:
1. Con un estropajo o un cepillo metálico limpiar el óxido más basto.
2. Sumergirlos 5 horas o más en VINAGRE.
3. Secarlos bien y aplicar algún aceite anticorrosión.

video de fq-experimentos que muestra el poder del vinagre contra la corrosión

Otro método, no tan accesible es:
1. Con un estropajo o un cepillo metálico limpiar el óxido más basto.
2. Aplicar desoxidante fosfatizante [es una solucion que se compra lista para usar, y que termina de eliminar el oxido que queda y simultaneamente, estabiliza la superficie, no permitiendo que la corrosion progrese. Se puede adquirir en ferreterías y droguerías]

Otro método es la electrólisis:


Algunas personas utilizan:

Bicarbonato sódico: se hace una pasta mezclándolo con ácido cítrico (zumo de limón)
WD-40, pasando una lija para metal
Oxifast
Cocacola (no tan efectiva como otros métodos).

[Howto] Afilar las herramientas

Posted: by Termita in Etiquetas: , , ,
0

Colores del Ghillie

Posted: by Termita in Etiquetas: , , , , ,
0

Estos son los colores y tonalidades de un ghillie en función del entorno en que se va a combatir:


Como complemento, y como una imagen vale más que mil palabras, las diferencias entre un ghillie y un leshy:

ghillie

 leshy


Cómo evitar ser visto, tutorial de los M.P

Manuales técnicos (desmontajes, etcétera) de réplicas de airsoft

Posted: viernes, 29 de marzo de 2013 by Termita in Etiquetas: , ,
0

Manual del francotirador / tirador selecto del Ejército de Tierra Español

Posted: lunes, 25 de marzo de 2013 by Termita in Etiquetas: , , , , ,
0

[HowTo] desarme Ak105 CYMA (CM.047D)

Posted: by Termita in Etiquetas: , , , , ,
0


Descargar .pdf [https://docs.google.com/file/d/0B-Nj6Uk4DuEUc1hhYmVPeE1Yd2s/edit?usp=sharing]


Este Tutorial va destinado a las personas, que tienen o quieren cambiarle el muelle a su réplica y cuando les viene a la cabeza "desatornillar tornillos" les dá pánico, :9]pero  no teman, con este tutorial procuraré ayudarlos.

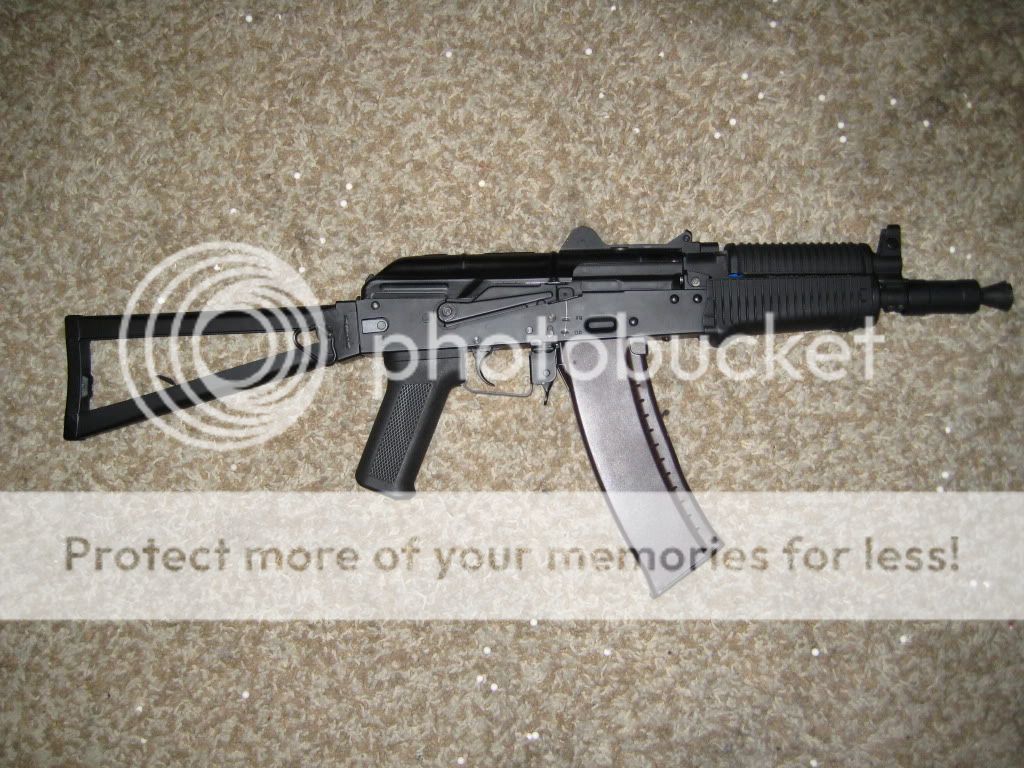
Para comenzar , el desarme que se llevará a cabo es el desarme de un ak105 CYMA (CM.047D), para cambiarle el muelle ya que de fábrica trae un muelle de 110 aproximadamente porque tira ni más ni menos que 365 FPS con bolas de 0.20g.
BUeno lo principal es tener una mensa libre, despejada. Se recomienda poner un paño sobre la mesa para evitar mancharla y que los tornillos si se caen no reboten peligrando perderlos.
Además de unas cuantas herramientas como:
destornillador  de estrella
destornillador plano 
alicates 
Y paciencia....

Una vez puesta la réplica sobre la mesa de trabajo:

si esta es de culata pleglabe recogerla(ahorraremos espacio en la mesa) y quitaremos la tapa superior que tapa donde se suele ubicar la batería de las aks, para sí comenzar a quitar piezas;
COmenzemos quitando la pieza ubicada en la parte superior del selector de tiro, no se su nombre exacto pero yo la llamo el cerrojo,este se quita de manera muy sencilla:
Para poder sacar el Gear box sin problema aparteremos la zona del cañón y el hop up que no nos interesan desarmar en este proyecto, aflojando los 4 tornillos situados en la parte baja del ak(esto no es igual en todas las ak CYMA ejem:ak74 U) justo en donde se situa el cargador 2 tornillos y delante de este hay  otros  2 tornillos , que tras quitarlos se tira hacia la derecha y sale el conjuto de cañón y hop up juntos con el guardamos sin desarmalos:
Ya disponemos del cuerpo del ak listo para comenzar con la extracción del Gear box:
Es necesario sacar dos piezas para poder sacar el Gear box,1º el selector de tiro, este se puede sacar levantando la platina de plástico con un simple destornillador plano y luego desatornillar el tornillo ubicado debajo de este, con lo cual el selector se podrá quitar y 2º el culatín o abrazadera como lo quieran llamar se quita simplemente aflojando el tornillo ubicado en la parte baja de este:
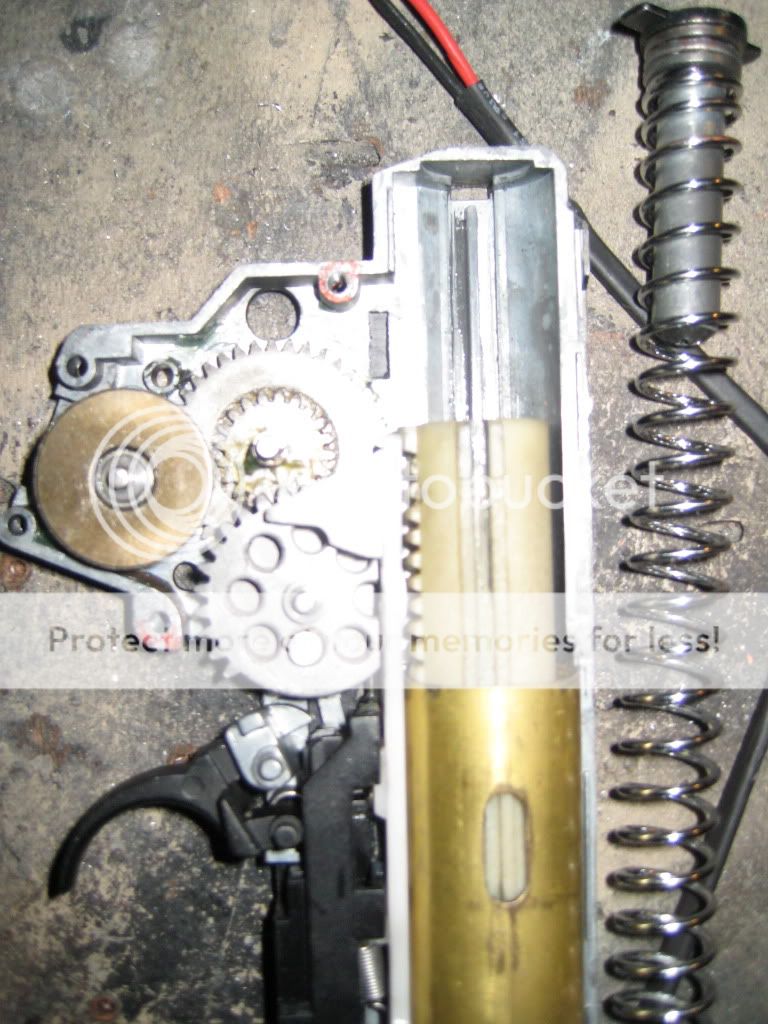
Ahora deslizando con mucho cuidado hacia arriba el Gear box saldrá sin problema, nos encontraremos con el típico Gear box V3 instalado en las ak , en este caso de CYMA:
Empezaremos quitando las piezas que hacen funcionar el selector de tiro :
Estas piezas son de facil extracción, ya que no están atornilladas, luego nos encontraremos con otra atornillada , la de la izquierda que tienen que tener en cuenta que la posición de la foto es su posición neutral donde el gear box está puesto en seguro así debe de estar siempre así, porque si no luego no estarán cordinados los engranajes  del selector de tiro:
PAra aflojar esta pienza tenemos que tener en cuenta que en el lado posterior del gear box esta está atornillada con otra encargada de hacer funcionar el selector de tiro:
se agarran ambas, se afloja el tornillo y ya las podemos sacar y guardar a un lado hasta el rearme:
Luego no hay que olvidar una pieza de plástico encargada de proteger los engranajes de tierra, golpes y que los toquemos ubicada detrás del gatillo , la cual se saca con un destornillador plano haciendo algo de palanca en sus dos pestañitas, una en cada lado del gear box:
Esta:
luego toca desatornillar el motor , encargado de mover los engranajes del gear box aflojando esos 2 tornillos :
una vez aflojados simplemente hay que tirar de este, hacia abajo y saldrá sin dificultad:
Bueno ustedes saben que el momento más critico en el vuelo de un avión es siempre el el aterrizaje y el despegue, pues en el Gear box de una réplica el desarme y el rearme de este son esos momentos críticos ya que  el muelle viene esamblado con presión en el Gear box con lo cual hay que tener algo de cuidado y maña:
Quitamos todos los tornillos del gear box y situamos el dedo índice y el dedo gordo de la mano sobre esas partes del gear box antes de abrirlo:
ASí evitaremos que el muelle desarme medio gear box al abrir este:
A continuación podemos sacar la guía del muelle de su anclaje y dejar estirarse el muelle y ya podremos quitar el dedo gordo de encima del cilindro:
8
Ahora toca cambiar el muelle , tan fácilmente como sacando la guía del muelle(la pieza que está por dentro del muelle) y poniendo el nuevo muelle(muelle de 100Sp guarder 330-340FPS) en esta:
esto lo encajan justo donde estaba encajado dentro del pistón que es este, que está situado dentro del cilindro:
Ya estaría cambiado el muello,pero les voy a resaltar cosas que les puede ser necesarias al desarmar el gear box:
1º el gatillo en ocasiones(por no decir casi siempre) se desarma y se sale de su ubicación, es fácil colocarlo,  lo explico:
este está compuesto por 3 piezas:
estos se colocan de la siguiente manera en el gatillo para encajarlo en el gear box:
este conjunto se encaja en el siguiente lugar del gear box, encotramos los 2 huecos para encajar el gatillo y un poco arriba el hueco donde se encaja ese muellecito que hace que el gatillo cada vez que dispares se ponga en posición neutral el gatillo:
y ya estaría montado el sistema de gatillo en el Gear box:
2º en ocasiones se suelen desencajar los engranajes o simplemente uno los quiere engrasar(cosa que recomiendo ya que casi siempre vienen algo secos y  al engrasarlos ganaremos menos fricción, más fluidez y un ligero aumento de 2-4 FPS), así que les explico como montarlos una vez quitados(esto debido que quitarlos es fácil, lo complicado casi siempre es acordase de como  estában colocados) para poder coordinarlos bien:
Engranajes y  seguro anti reverse engrasados :
IMPORTANTE:  que cada engranaje tenga sus arandelas y más aún su casquillo o puesto en su eje o encajado en el gearbox.
Aquí pongo las fotos paso a paso del encaje de los engranajes:
este último encajado es el que yo llamo el seguro anti reverse encargado de evitar que el gear box funcione en el sentido contratio, este trae una especie de resorte que hay que saber ponerlo para su correcto funcionamiento:
Una vez aclarado esto , y puesta esta pieza en el gear box podemos encajar el último engranaje:
una vez los engranjes puestos y el muelle cambiado , hay que serciorarse que los engranajes está coordinados fíjandonos que el 2º engranaje puesto coincide con el pistón:
una vez echo esto ya pueden llevar a cabo el cierre del gear box, realizando los mismos pasos dados anteriormente para desarmarlo , pero esta vez de forma invertida para rearmarlo, les aconsejo que una vez armado el gear box lo pruben para saber si todo funciona correctamente , así si algo no está bien montado solo tenga que desarmar el gear box y no el ak entero!(lo digo por experiencia XD)


fuente: Petrof1992 spetsnaz

REVIEW Cyma CM.045 AKS74U Plum version

Posted: by Termita in Etiquetas: , , , ,
0

.pdf [https://docs.google.com/file/d/0B-Nj6Uk4DuEUS0UtOExCYVp1Z0k/edit?usp=sharing]


... y este video muestra el desmontaje del hopup y el cañón


{Table of Contents}:
Real Steel History
Airsoft History
First impressions
Pictures
Quality
     Externals
     Internals
Discrepancies
Pros/Cons
final thoughts


Real steel history-

The AK-74 (Kalashnikov Automatic Rifle, Model 1974 (Russian: Автомат Калашникова образца 1974 года) is a 5.45mm assault rifle developed in the early 1970s in the Soviet Union by Mikhail Kalashnikov. It was developed from the earlier AKM (itself a refinement of the AK-47) and introduced in 1974. The rifle first saw service with Soviet forces engaged in the Afghanistan conflict. Presently, the rifle is used by the majority of countries of the former USSR. Additionally, unlicensed copies were produced in Bulgaria (AK-74 and AKS-74U), China (Type 88), the former East Germany (MPi-AK-74N, MPi-AKS-74N, MPi-AKS-74NK) and Romania (PA md. 86).

The AK-74 is an adaptation of the 7.62mm AKM assault rifle and features several important design improvements. These modifications were primarily the result of converting the rifle to the intermediate-caliber 5.45x39mm cartridge, in fact, some early models are reported to have been converted AKMs, with the barrel resleeved to 5.45x39mm. The result is a more accurate and reliable rifle than the AKM. The AK-74 and AKM share an approximate 50% parts commonality (interchangeable are most often pins, springs and screws).

Operating mechanism
The rifle’s operation during firing and reloading is identical to that of the AKM. After ignition of the cartridge primer and propellant, rapidly expanding exhaust gases are diverted into the gas cylinder above the barrel through a vent near the muzzle. The build-up of gases inside the gas cylinder drives the long-stroke piston and bolt carrier rearward and a cam guide machined into the underside of the bolt carrier rotates the bolt approximately 35° and unlocks it from the barrel extension via a camming pin on the bolt. The moving assembly has about 5.5 mm (0.2 in) of free travel which creates a delay between the initial recoil impulse of the piston and the bolt unlocking sequence, allowing gas pressures to drop to a safe level before the seal between the chamber and the bolt is broken. Like previous Kalashnikov-pattern rifles, the AK-74 does not have a gas valve; excess gases are ventilated through a series of radial ports in the gas cylinder. Since the Kalashnikov operating system offers no primary extraction upon bolt rotation, the AK-74 bolt has a larger extractor claw than the 7.62mm AKM for increased extraction reliability. Other minor modifications were made to the bolt and carrier assembly.

- wikipedia 10/5/09 all rights reserved


Airsoft history-

It used to be that when you wanted a good aks74u replica you NEEDED to get the VFC, and maybe for some people with a budget the Dboys was the way to go. well fear no more, if you need one or just plain want one, then turn your head here and take a look at this bad boy. the new Cyma Cm.045B aks74u is something to contend with the $360-400 price tag on the VFC. this gun is no where near the quality of the VFC, its much better. the internals, externals, and feel are just superior when compared to the VFC. this gun has the quality and feel to get the job done ten fold on the battle field. 


First impressions-

well first off i'll start with where i bought it, which was at the best CQB field in the PNW and that is Tacoma tactical. i bought it for $160, which was about the same as it would've been shipped from weaponblender. i bought 2 extra mags and the total was about $205 for all of it after tax. now when i took it out of the box i was very surprised how hefty and little it was at the same time. it weighs about 8 lbs with out a battery and 9 with the battery and a full mag. it came with an 8.4v 1400mah battery, a crappy charger, a cleaning rod, 1 mag and the gun itself. it has great looking externals. and before i even fired the gun i had to open it up to put a m85 spring it so i could use it for cqb right away, and man was i blown away by how nice the internals were, but I'll get into that later. this gun looked like a great investment so far and i was very happy with my purchase. i wanna give a special thanks to Jason Daniels at TacTac for giving me a discount from the original $170 price tag to the $160 i was charged...


Quality-

Externals-

The externals on this gun are great, and they make the gun look and feel phenomenal. the whole body is damn good quality steel and you can tell. the polymer grips are both very good quality and feel great to hold and give you a feeling that you are holding a real gun. from about 5 feet away there would be no way to tell if it was real or not! but don't let the price of $140-170 fool into thinking that it must be cheaply made and low quality, because if you do then you will regret it when you see mine...

Internals-

the internals on this gun are what intrigued me the most. the gun has been basically redesigned from the motor housing up the the gearbox retainer on top. it has redesigned 7mm bushing the the oil grooves cut in a different spots than a standard oil grooved bushing for better lubrication of the gear shafts. the gearbox has many more reinforcing spots on it than most and the gearbox has a feel to it like I've never felt on a GB, i can't really describe it. but it does feel stronger and much beefier than a standard ver3 gearbox. the wiring harness is very nice and may last for a long while, only time will tell. the piston/head are decent quality I've put in a deep fire piston and JG ballbearinged head on since I've bought it. and the gears are extremely high quality and look very well made, not like the previous "NZ" brand Cyma puts in there previous models. the best part about this gun IMO is the stock 6.032mm tightbore barrel, it gives great accuracy and groupings, and the metal hopup chamber is a great plus! the motor is basically a systema magnum, it'll definetly pull most springs with ease(pulled an m140 with an 8.4v 1400mah battery). the only upgrades I've installed since i bought it 2 days ago are the deep fire piston and jg head, and a G&P bucking and G&G air nozzle w/ o-ring. so basically this gun is an awesome buy if you want great internals for a cheap price!


Discrepancies-

i don't really have any discrepancies with this gun, but the fact that the handgrip wobbles just a little bit. thats about all, but time will tell if i find more. i'll update this if i find more...

PRO'S-

great internals
good price
awsome look and feel
600 round mag
great range for a small gun
its an ak, so it'll last
everything about this gun is a Pro

Con-

Semi wobbly handgrip....

Final thoughts-[/b

Basically if you want a Ak74su, get this one. its a very good gun for the price and Cyma has a Wood handgripped model too. it shoots far fast and straight. so its perfect for me. it also has the size to make you happy about carrying it.. not like an m16 or ak47. and you can never go wrong with a gun this high quality for $160!!

thanks for reading my review guys it took awhile and i'm very happy with this gun.. please don't be afraid to ask any questions! i will add more stuff as i get it done!


fuente: †Höllen† tacoma airsoft