Osboxes, un sitio de donde descargar máquinas virtuales ya cocinadas
Posted: sábado, 22 de junio de 2019 by Termita in Etiquetas: linux, máquinas virtuales, sistemas operativos, virtual box, virtualización, vmware, windowsDesde la página Osboxes se pueden descargar máquinas virtuales de todo tipo ya cocinadas, tanto para VMware como para Virtual Box.
Todas las máquinas virtuales de VirtualBox y VMware cocinadas por Osboxes tienen el mismo USUARIO y CONTRASEÑA.
Por supuesto, después de identificarse en la máquina virtual el usuario puede cambiarlos o crear un usuario nuevo.
Username – osboxes
Password – osboxes.org
For Root user account
Password – osboxes.org
En la página oficial hay también una guía de uso de estas máquinas y
también dos videoguías: una para Virtual Box y otra para VMware.
Hay otro sitio en github llamado "Virtual Machines" que contiene bastantes máquinas virtuales ya cocinadas. Esta información es un aporte de David.
------------------------------
VirtualBox
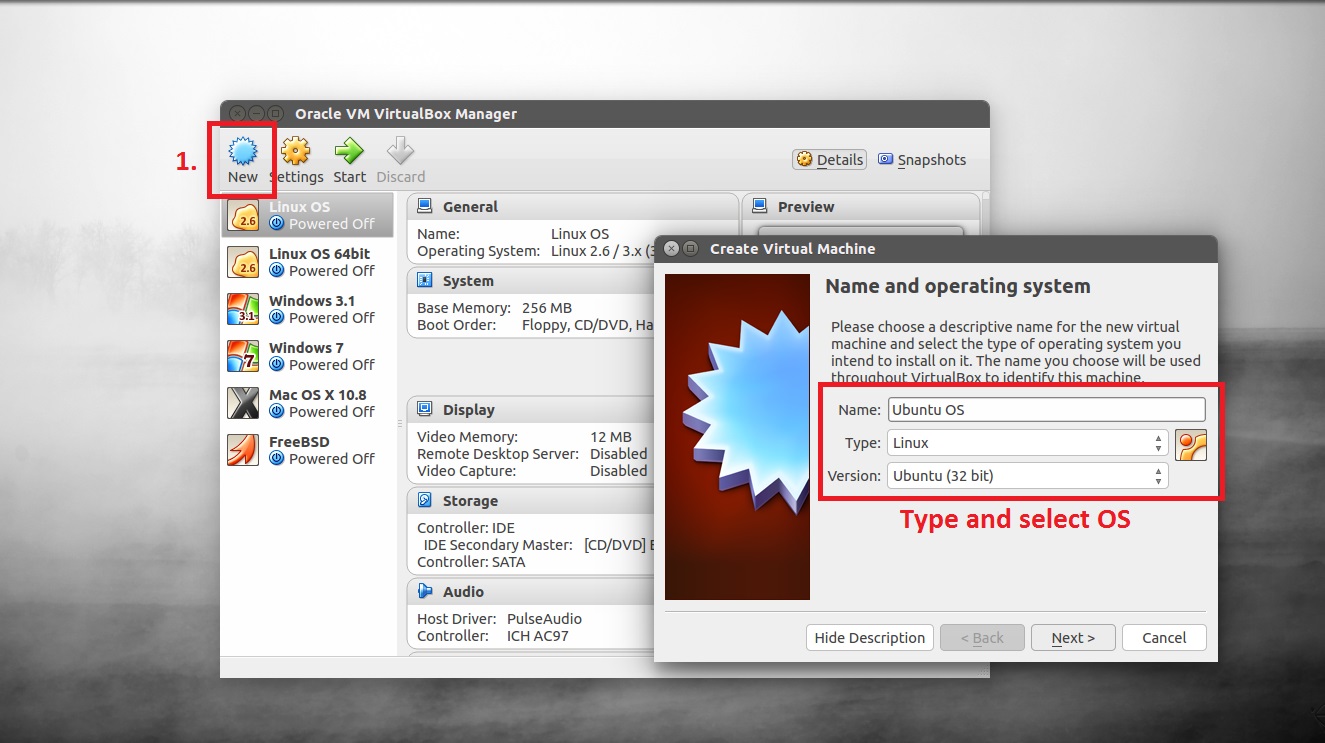
How to attach/configure image with VirtualBox?
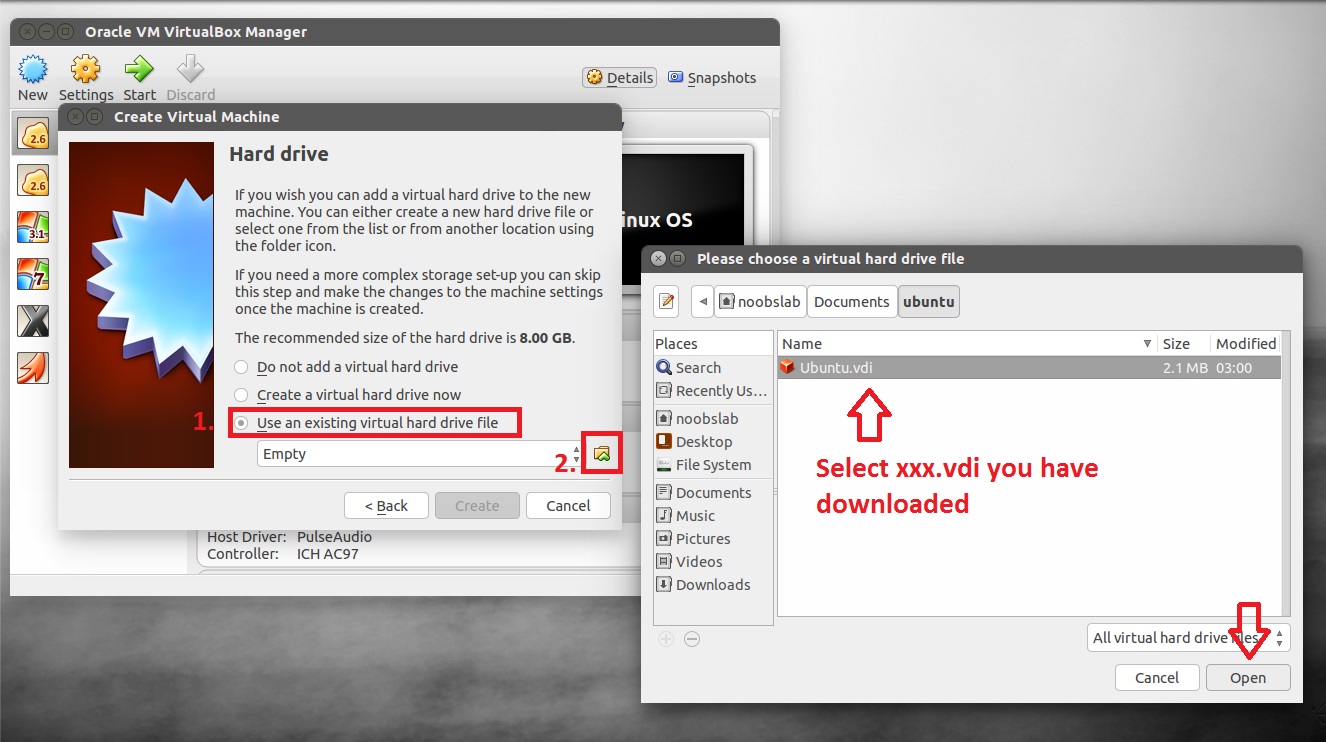
- When you reach at this window select 3rd option Use an existing virtual hard drive file
- Click on little folder to open file browser
- Navigate to directory where VDI image is located
- Select xx.vdi image and click OK
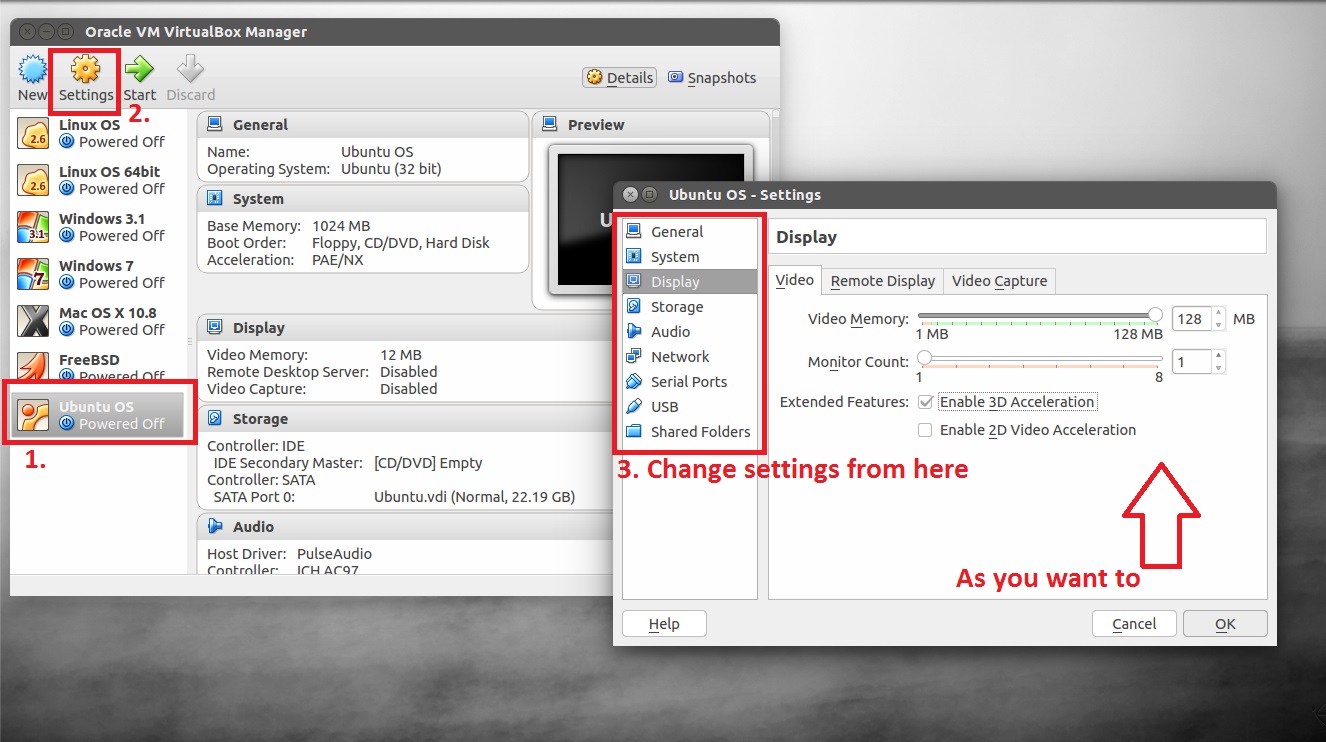
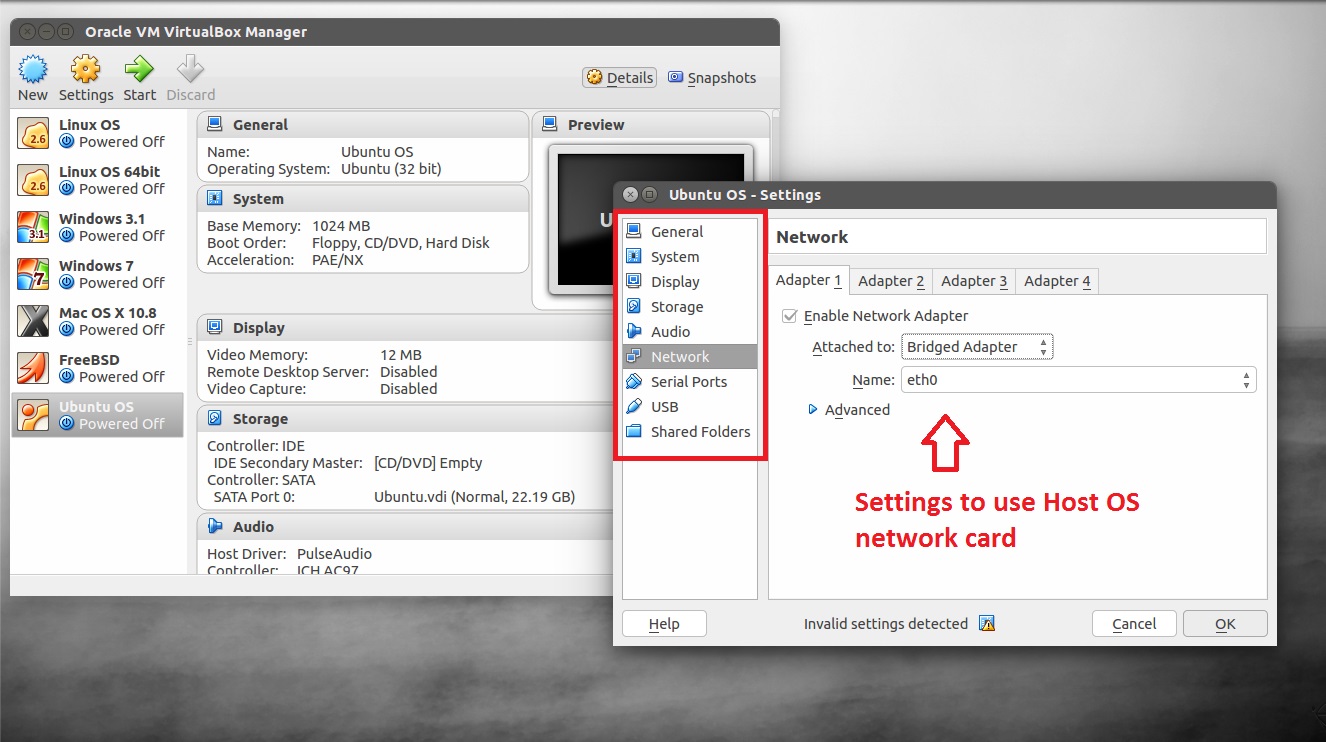
- Once Virtual Machine is created, select virtual machine and click on Settings
- In this picture you can see max video memory given to virtual machine. You can do that for better performance.
- Also check Enable 3D Acceleration, if you get any problem with VirtualBox after enabling it then disable this option.
- To use Network card that is already connected to Internet, navigate to Network
- Select Bridged Adapter and adapter you are using (for Wifi select wlan and for Lan select eth).
- Further you can play around with settings but these were important to configure. Also keep in mind that changing some settings can be a problem, you may not be able to boot virtual machine then you have to change those settings back.
- When you reach at this window select 3rd option Use an existing virtual hard drive file
- Click on little folder to open file browser
- Navigate to directory where VDI image is located
- Select xx.vdi image and click OK
- Once Virtual Machine is created, select virtual machine and click on Settings
- In this picture you can see max video memory given to virtual machine. You can do that for better performance.
- Also check Enable 3D Acceleration, if you get any problem with VirtualBox after enabling it then disable this option.
- To use Network card that is already connected to Internet, navigate to Network
- Select Bridged Adapter and adapter you are using (for Wifi select wlan and for Lan select eth).
- Further you can play around with settings but these were important to configure. Also keep in mind that changing some settings can be a problem, you may not be able to boot virtual machine then you have to change those settings back.
How to install Guest Additions?
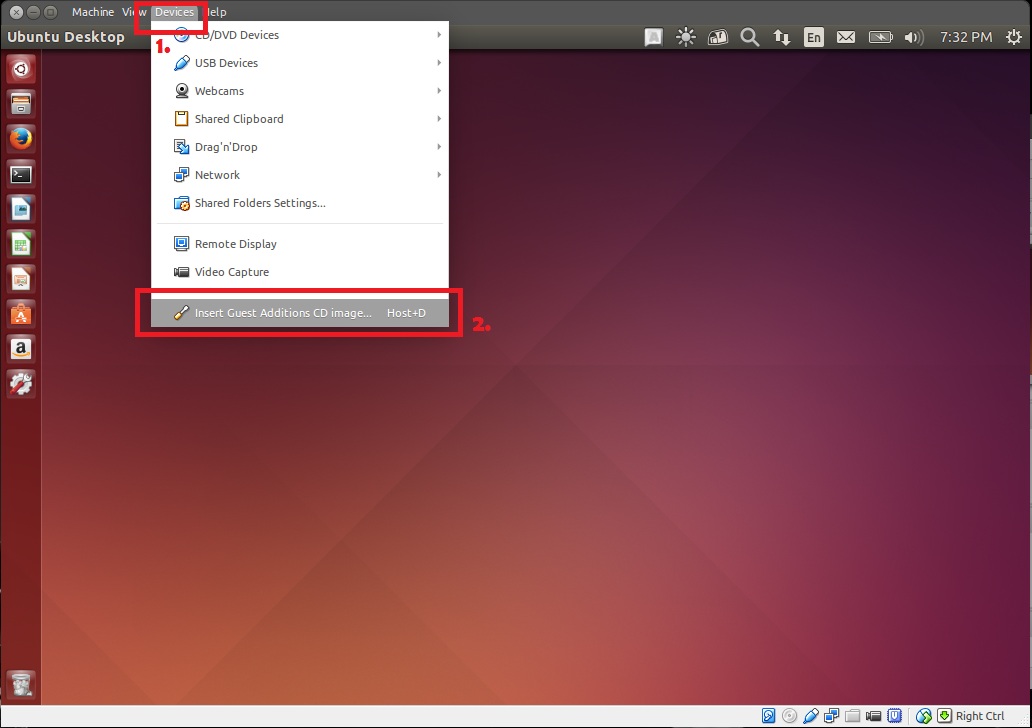
- Once you turn-on the Virtual machine, click on Devicesmenu
- Select Insert Guest Additions CD image… option
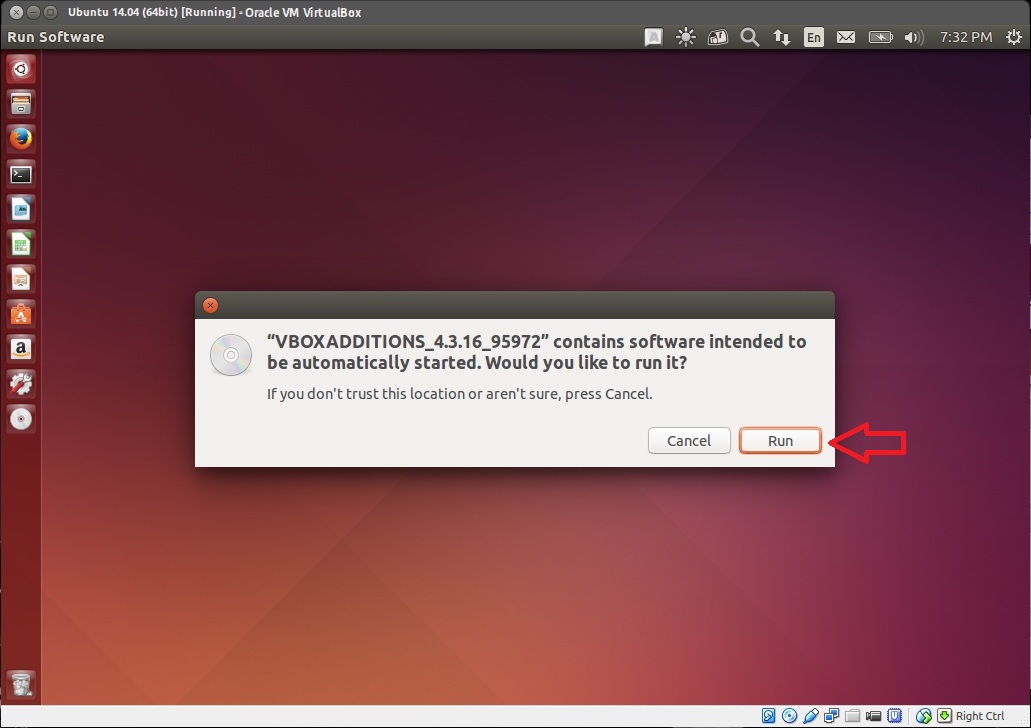
- Some Operating systems auto-prompt to install Guest Additions (Like Ubuntu)
- If you get it click on Run
- Alternatively check following instructions
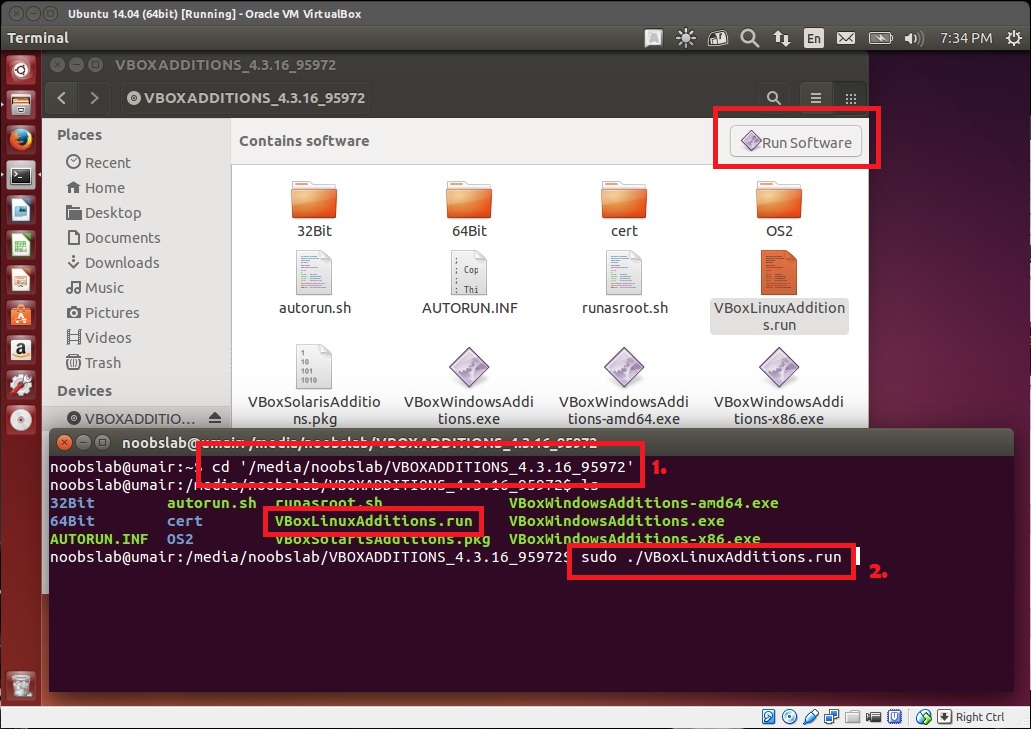
- Open VBOXADDITIONS from file manager and copy file to some directory
- Open Terminal and go to directory where you copied VBOXADDITIONS (If you see button on top right side of file manager saying Run Software then click on it to start installation and don’t follow next line instruction)
- Now run command to start Guest Additions installation
sudo ./VBoxLinuxAdditions.run
- Once installation finished, just reboot virtual machine.
- Once you turn-on the Virtual machine, click on Devicesmenu
- Select Insert Guest Additions CD image… option
- Some Operating systems auto-prompt to install Guest Additions (Like Ubuntu)
- If you get it click on Run
- Alternatively check following instructions
- Open VBOXADDITIONS from file manager and copy file to some directory
- Open Terminal and go to directory where you copied VBOXADDITIONS (If you see button on top right side of file manager saying Run Software then click on it to start installation and don’t follow next line instruction)
- Now run command to start Guest Additions installation
sudo ./VBoxLinuxAdditions.run - Once installation finished, just reboot virtual machine.
VMware
How to attach/configure image with VMware (VMDK file version)?
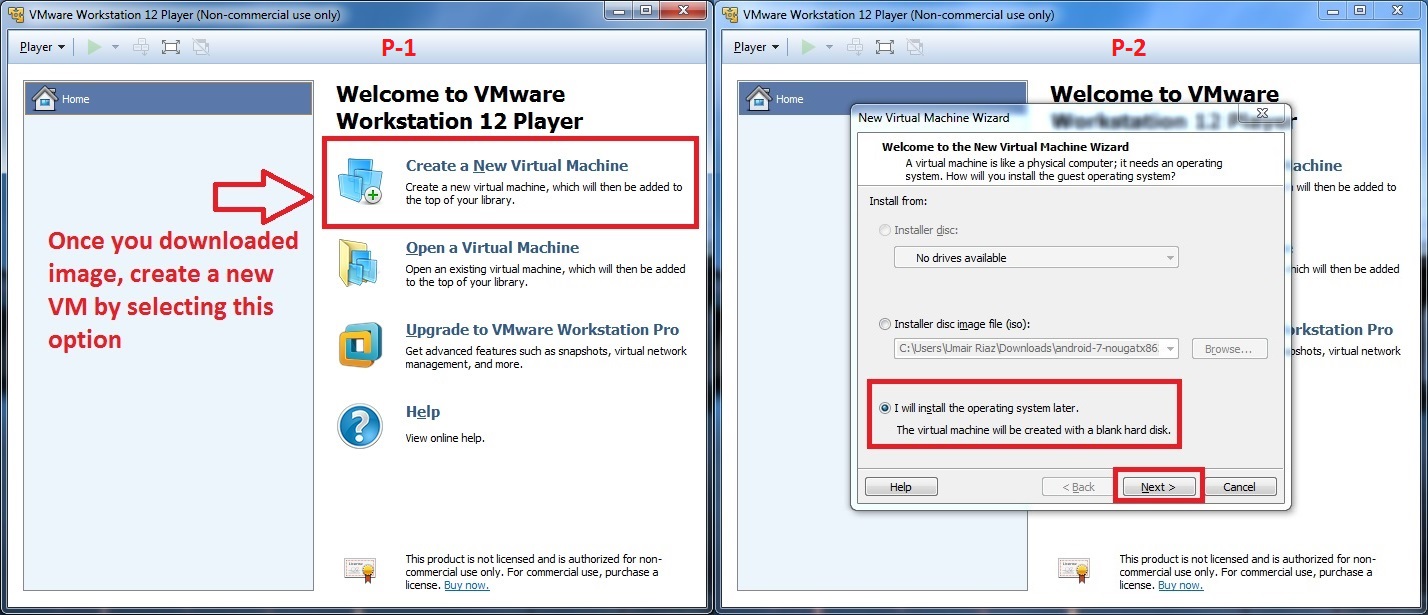
P-1
- First of all Download image and extract it somewhere
- Open VMware and click on Create a New Virtual Machine
P-2
- Select “I will install the operating system later.”
- click on Next
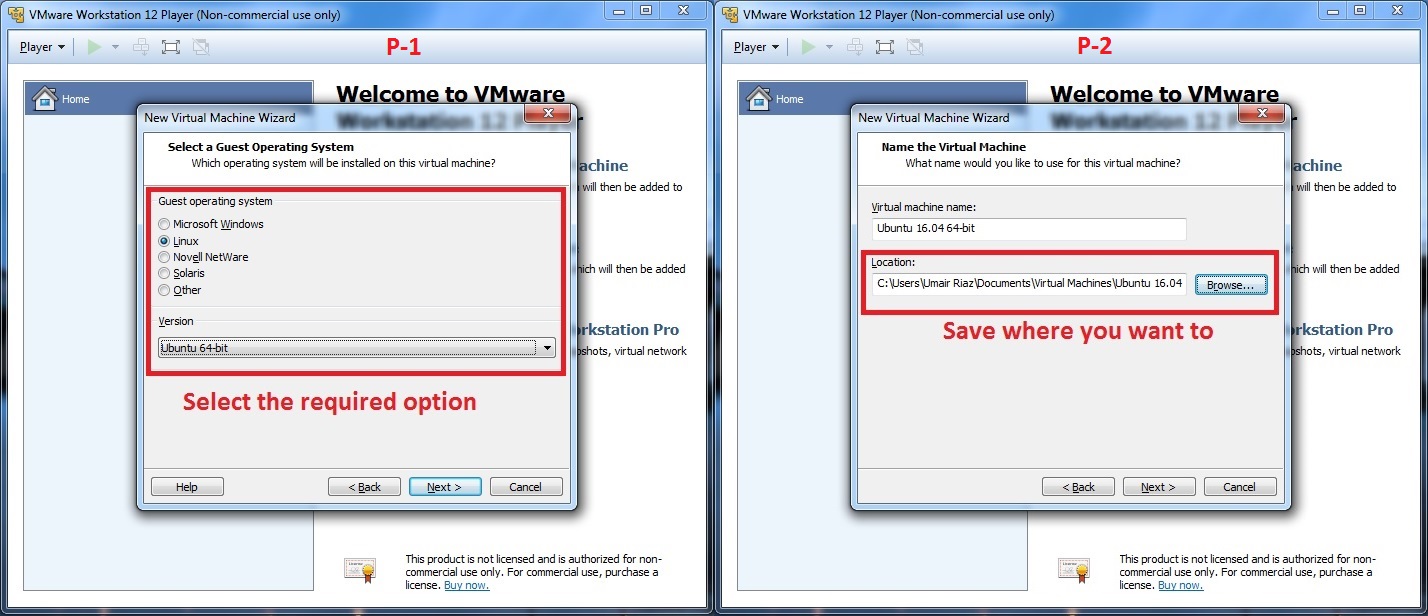
P-1
- Select OS you wish to run
- Click Next
P-2
- Give any name to virtual machine
- Set location where you want to save your VM files
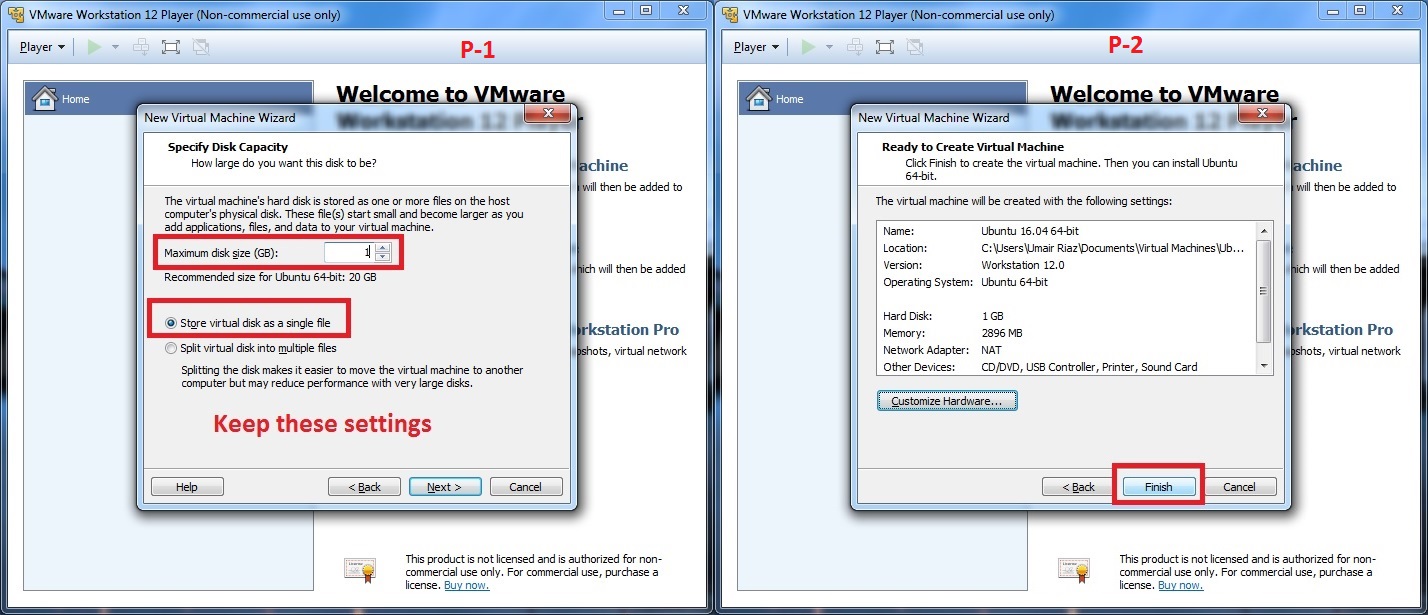
P-1
- Set maximum disk size to 1GB
- Select “Store virtualdisk as a single file”
- Click on Next
P-2
- Click on Finish
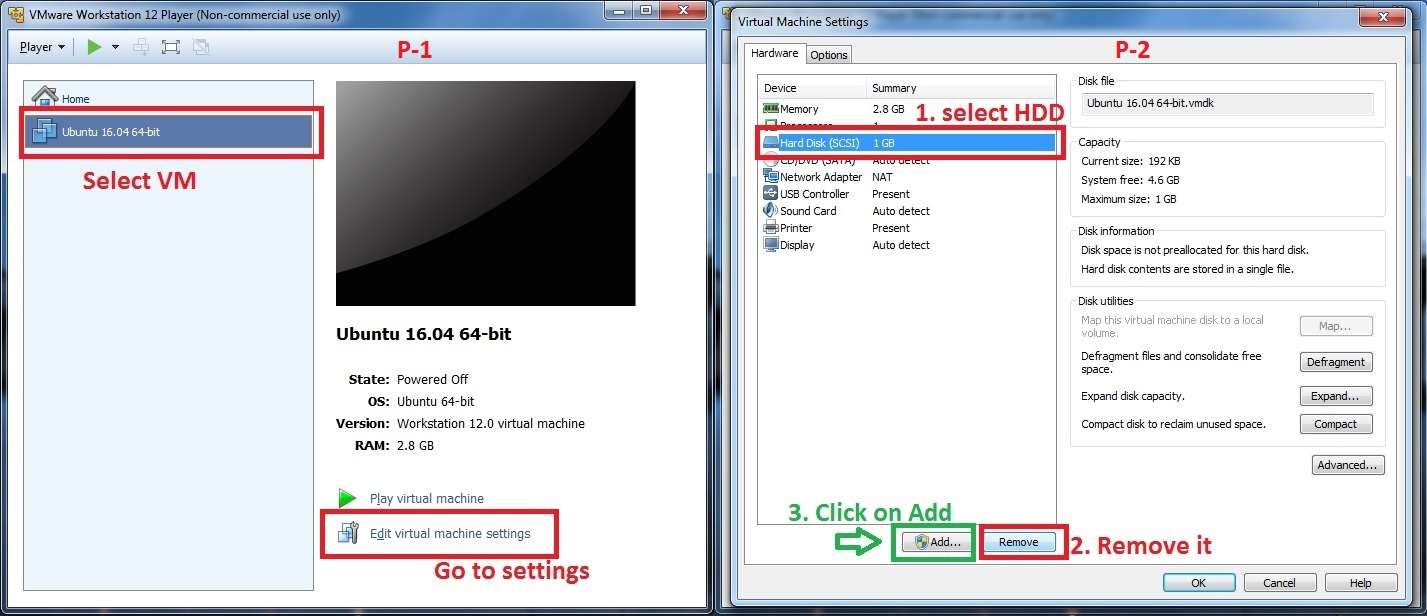
P-1
- Select the VM you have just created
- Go to “Virtual Machine Settings”
P-2
- Select Hard Disk and click on Remove
- Now click on Add
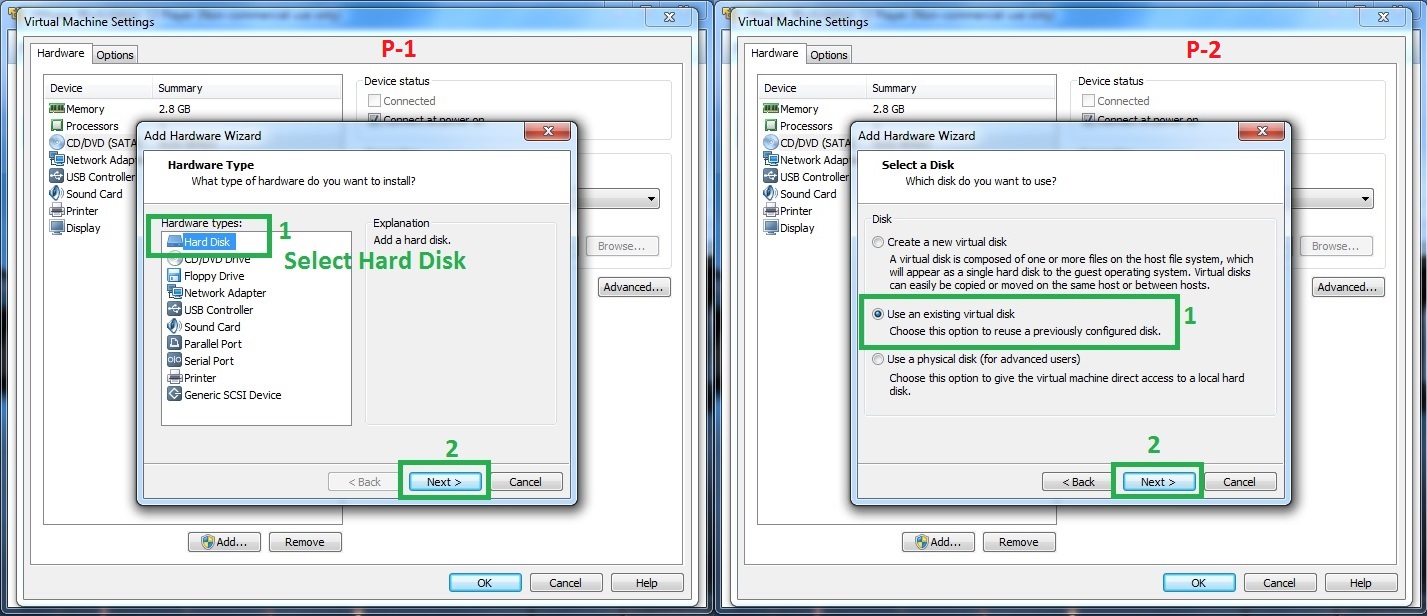
P-1
- Select the Hard Disk option
- Click on Next
P-2
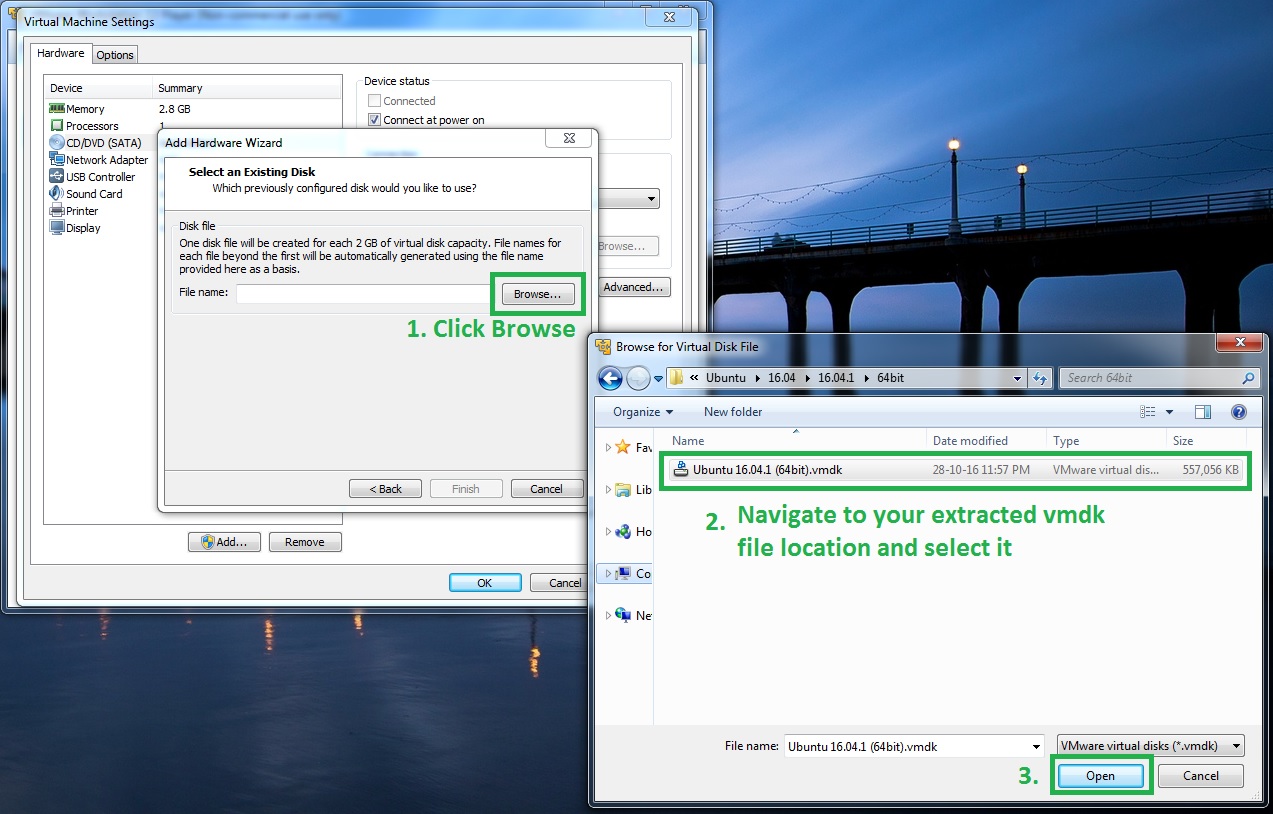
- Select Use an existing virtual disk
- Now click on Next
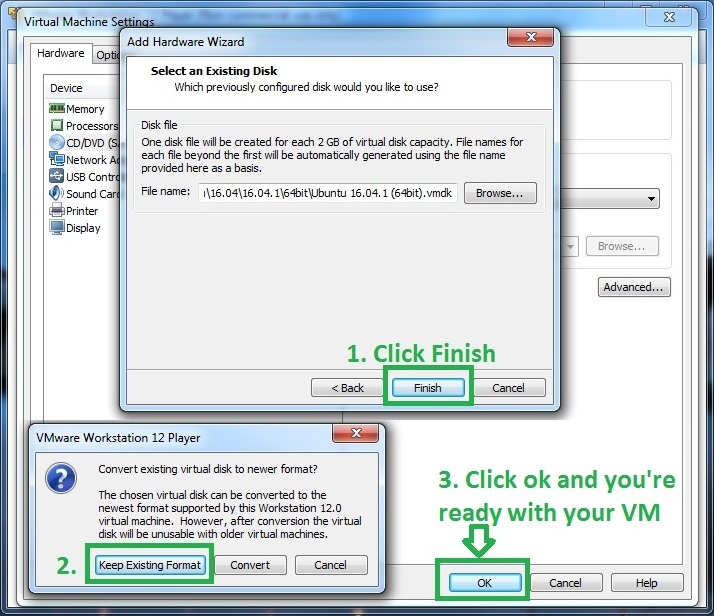
- Now click on Finish
- It will open a dialog, select Keep Existing Format
- Now click on OK and you are ready to use your VM
P-1
- First of all Download image and extract it somewhere
- Open VMware and click on Create a New Virtual Machine
P-2
- Select “I will install the operating system later.”
- click on Next
P-1
- Select OS you wish to run
- Click Next
P-2
- Give any name to virtual machine
- Set location where you want to save your VM files
P-1
- Set maximum disk size to 1GB
- Select “Store virtualdisk as a single file”
- Click on Next
P-2
- Click on Finish
P-1
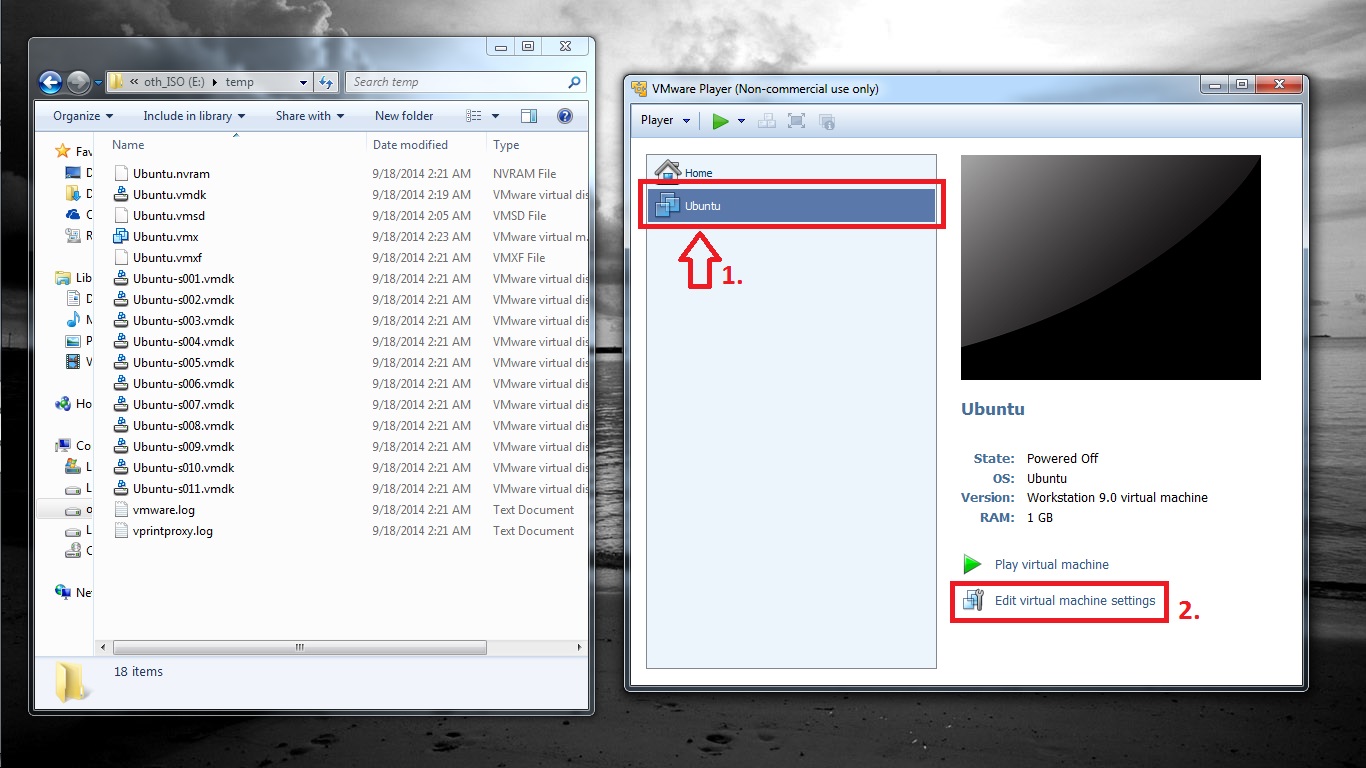
- Select the VM you have just created
- Go to “Virtual Machine Settings”
P-2
- Select Hard Disk and click on Remove
- Now click on Add
P-1
- Select the Hard Disk option
- Click on Next
P-2
- Select Use an existing virtual disk
- Now click on Next
- Now click on Finish
- It will open a dialog, select Keep Existing Format
- Now click on OK and you are ready to use your VM
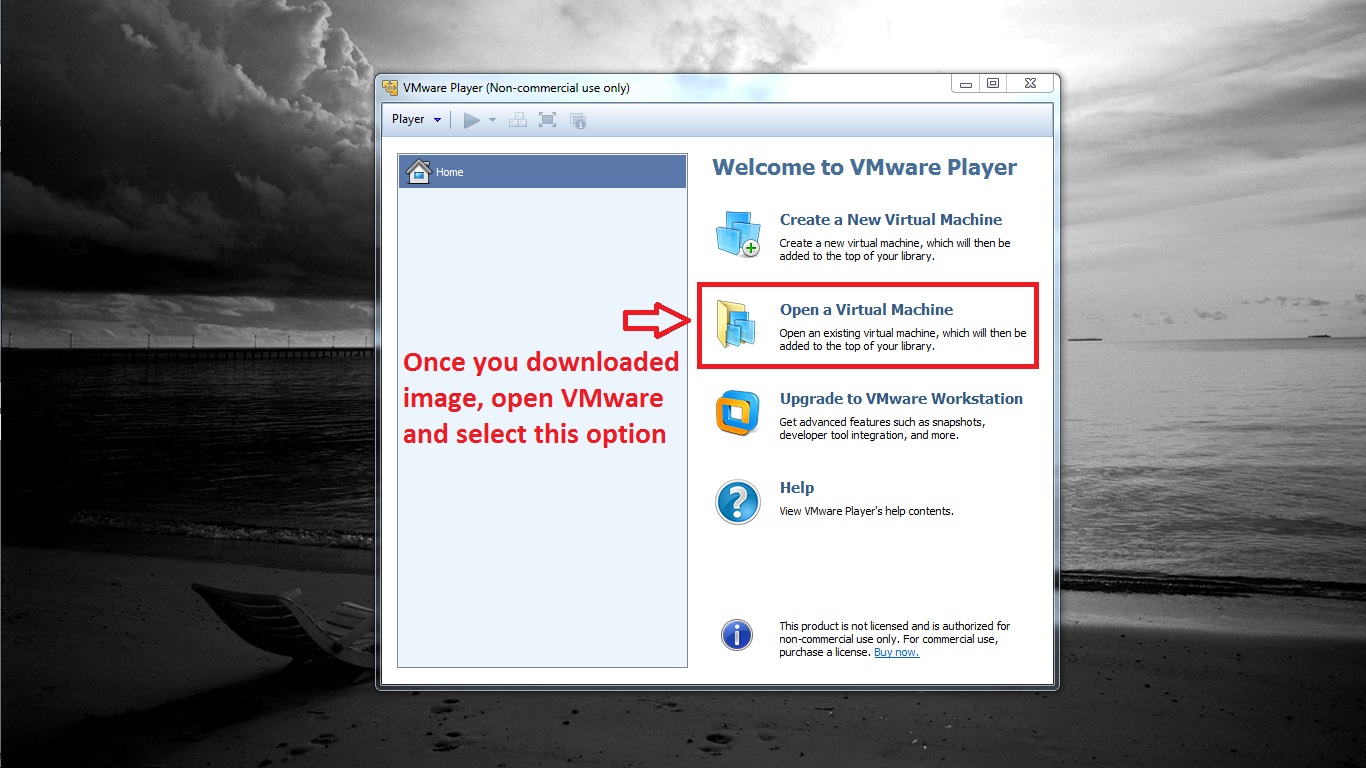
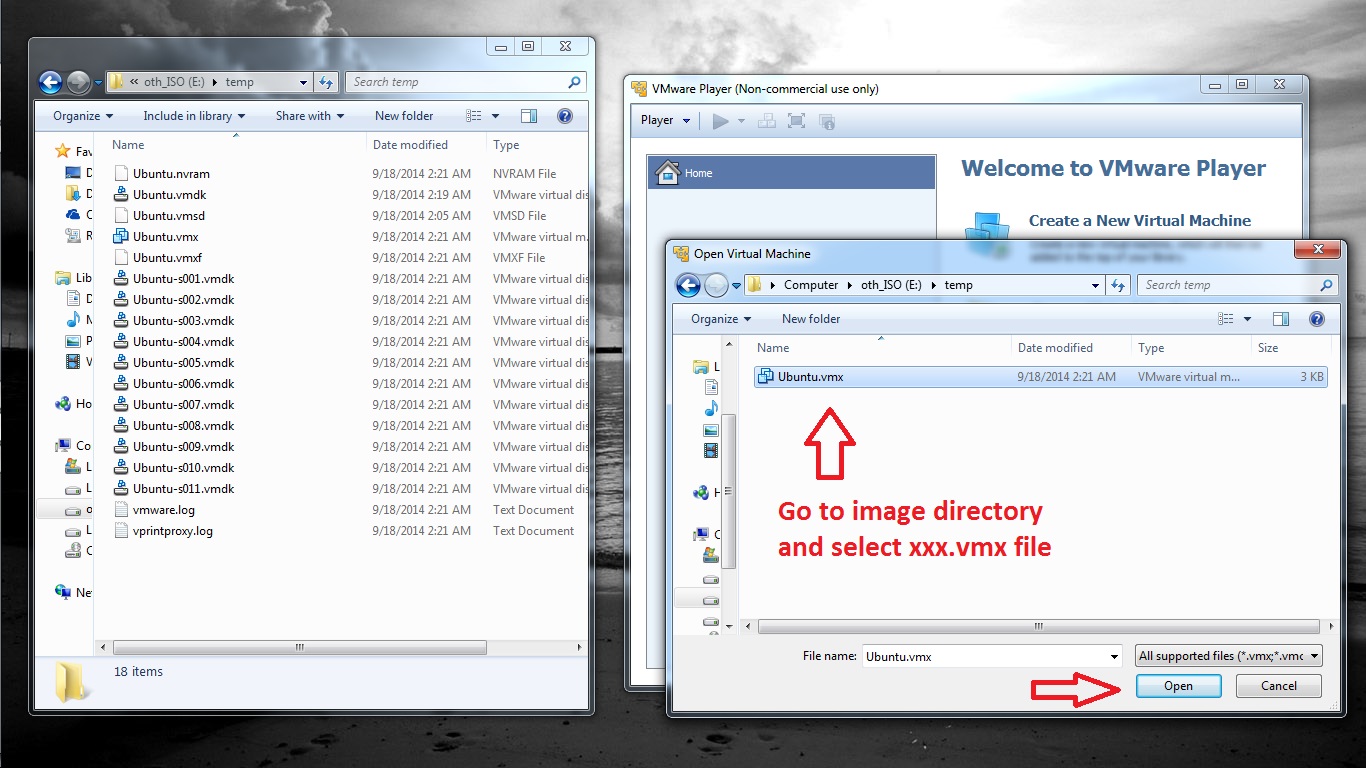
How to attach/configure image with VMware (VMX Version)?
- First of all Download image and extract it somewhere
- Open VMware and click on Open a Virtual Machine
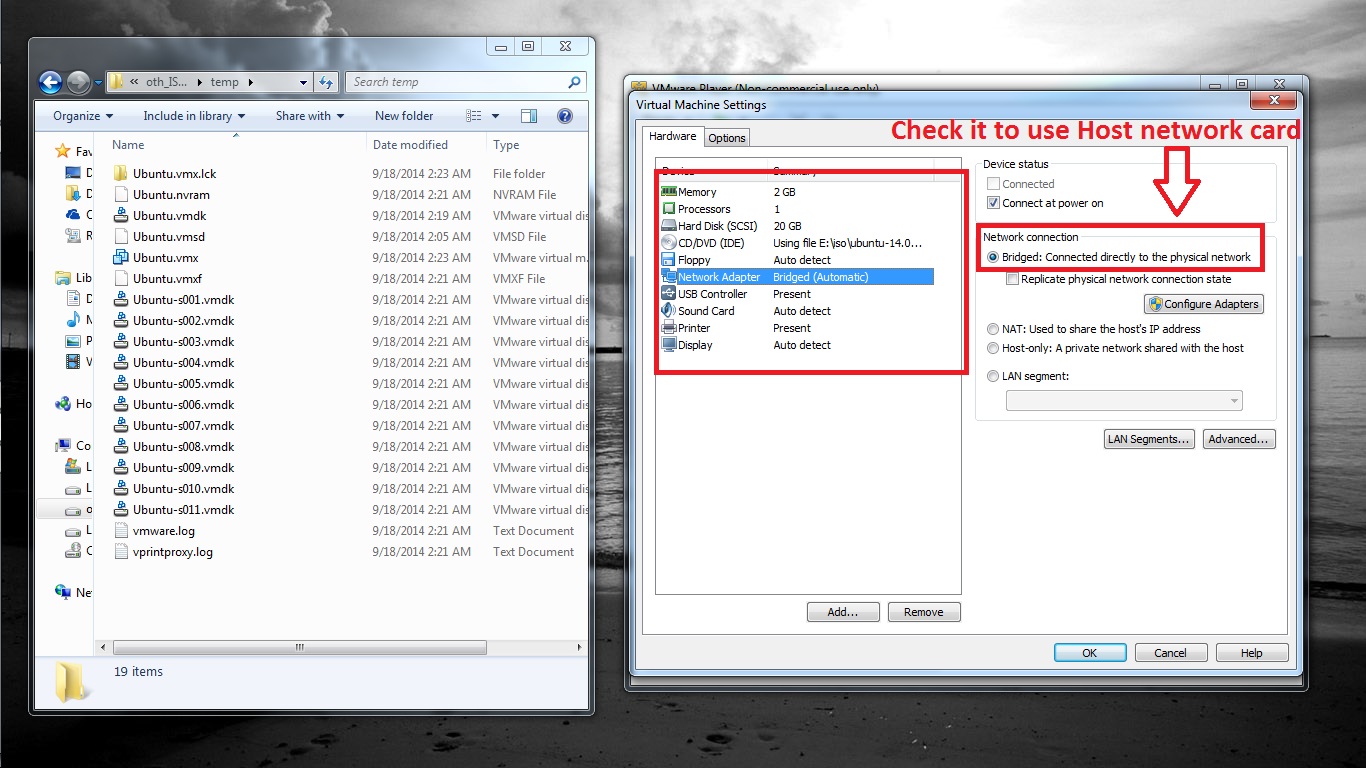
- To use Network card that is already connected to Internet, navigate to Network Adapter
- Select Bridged: Connected directly to the physical network
- Virtual machine will automatically can connection to Internet without any configuration.
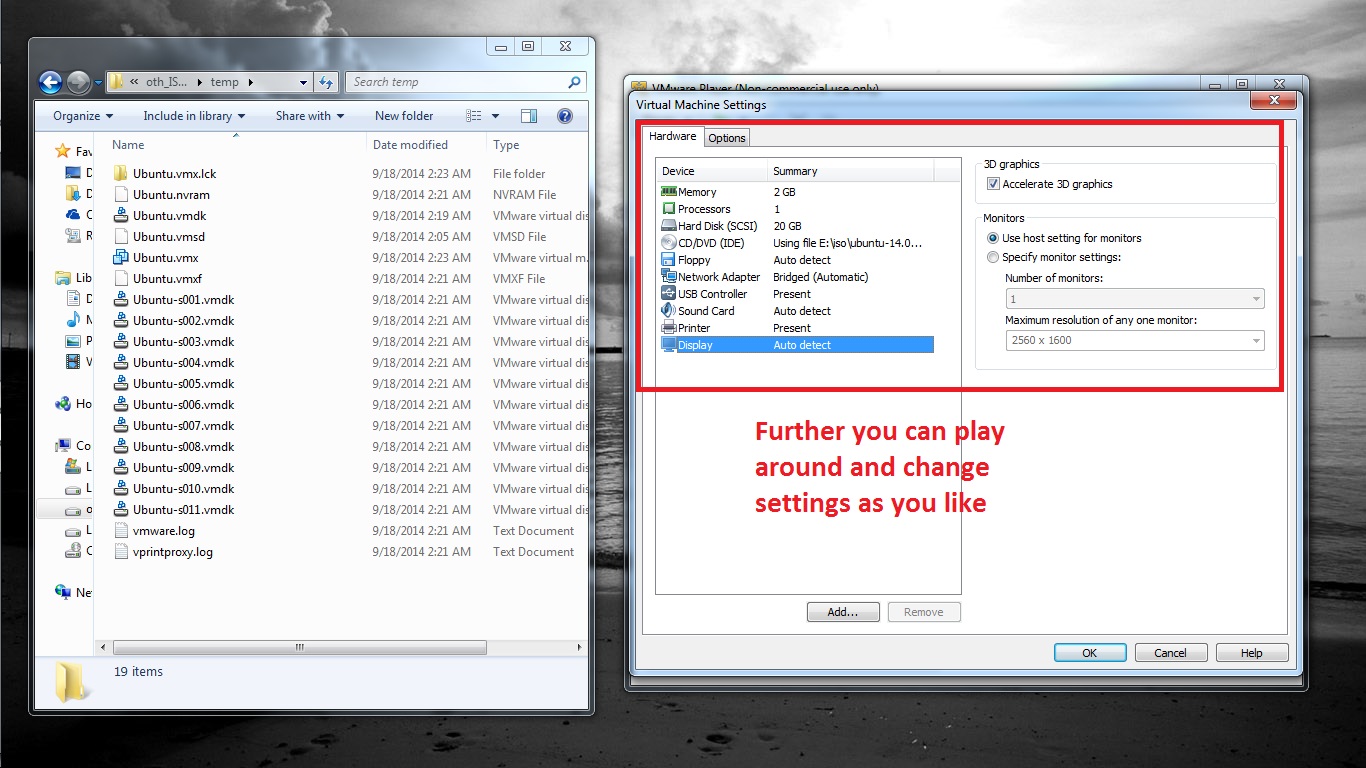
- From Display enable Accelerate 3D graphics for better performance.
- Further you can play around with settings but these were important to configure. Also keep in mind that changing some settings can be a problem, you may not be able to boot virtual machine then you have to change those settings back.
- First of all Download image and extract it somewhere
- Open VMware and click on Open a Virtual Machine
- To use Network card that is already connected to Internet, navigate to Network Adapter
- Select Bridged: Connected directly to the physical network
- Virtual machine will automatically can connection to Internet without any configuration.
- From Display enable Accelerate 3D graphics for better performance.
- Further you can play around with settings but these were important to configure. Also keep in mind that changing some settings can be a problem, you may not be able to boot virtual machine then you have to change those settings back.
How to install VMware Tools?
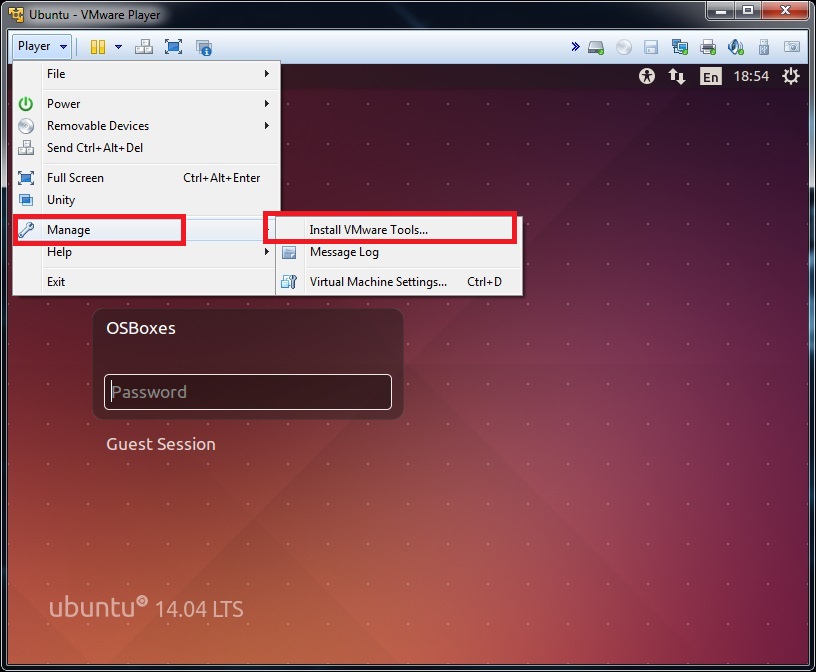
- Once you turn on virtual machine, Go to menu Player
- Select Install VMware Tools under Manage section.
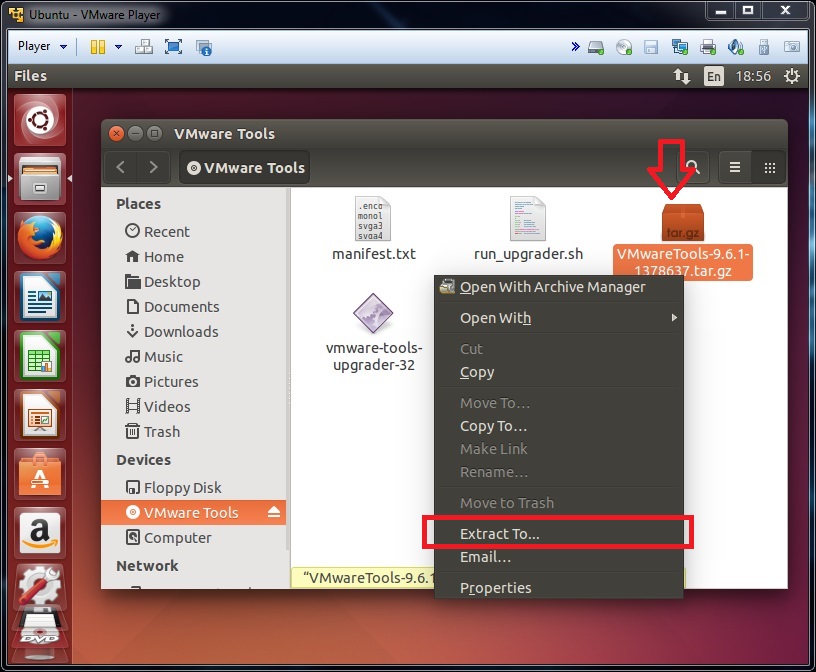
- Go to VMware Tools where iso is mounted.
- Right click on VMware-Tools-xxx.tar.gz file and select Extract To option then select directory and extract this archive.
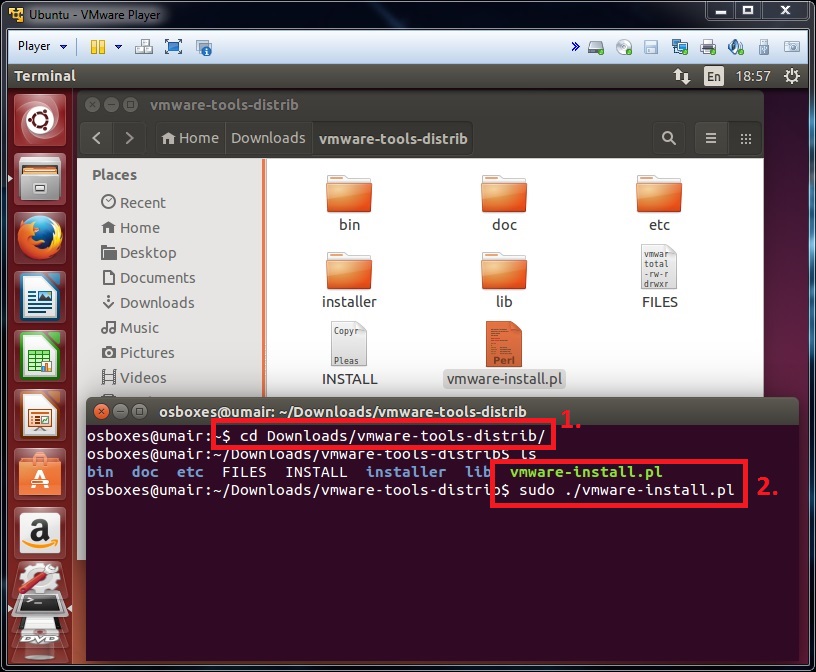
- Now open Terminal
- Go to directory where you extracted tools from Terminal
- Here you will find out vmware-install.pl file
- Enter this command to install Vmware Tools
sudo ./vmware-install.pl
- And follow instructions (To install these tools you don’t even need to change any default option, unless you need it).
- Once you turn on virtual machine, Go to menu Player
- Select Install VMware Tools under Manage section.
- Go to VMware Tools where iso is mounted.
- Right click on VMware-Tools-xxx.tar.gz file and select Extract To option then select directory and extract this archive.
- Now open Terminal
- Go to directory where you extracted tools from Terminal
- Here you will find out vmware-install.pl file
- Enter this command to install Vmware Tools
sudo ./vmware-install.pl - And follow instructions (To install these tools you don’t even need to change any default option, unless you need it).
-------------------------------
Fuentes:
Buen artículo. Hay una alternativa muy interesante llamada "Virtual Machines": https://virtual-machines.github.io